Fly Fishing 101
How to Photograph a Fish (and Keep It Alive)
 Daniel Bowman
Updated November 4, 2026
10 min read

The short version
The best fish photo for the fish is one taken in the water, or just above it, with the camera ready before the net comes up. Keep Fish Wet's guidance is to "keep air exposure to 10 seconds or less," and Trout Unlimited's is 15 to 20 seconds. Get the phone out, unlocked and set before you lift; have the photographer count down; lift low over the water with wet hands; shoot a burst; and put the fish back. Research shows photos add air time, and a ready camera is how you stay inside those shorter limits. In warm water or after a long fight, take the photo in the net or skip it.
A good fish photo is a nice thing to bring home. It can also add to the time a trout spends out of the water, which is the part of catch and release anglers can most easily shorten.
This guide covers both halves: what the research says about air time, and how to take a photo that's worth keeping in those few seconds. On our private water, all fishing is catch and release, and our trophy trout trips promise "photos worth framing," so this is how we think about both.
How many seconds can a trout spend in the air for a picture?
The two sources set different limits, and the safe aim is the shorter one. Keep Fish Wet's tips page says "keep air exposure to 10 seconds or less." A 2014 Trout Unlimited research summary on handling stress suggests 15 to 20 seconds.
The same TU summary shows why the seconds matter. In a lab study it cites, "rainbow trout survival after being exercised (simulation of being caught) was 88%, but survival decreased to 62% when fish were exposed to air for 30 seconds after exercise and survival decreased further to only 28% after 60 seconds of air exposure."
That's a lab result on tired fish, and real-world effects vary by species and conditions. In that study, survival was lower after 30 seconds of air and lower again after 60.
| Source | Air time guidance |
|---|---|
| Keep Fish Wet | "10 seconds or less" |
| Trout Unlimited (2014) | "15-20 sec" |
Why does the photo add so much time?
Because a photo adds steps while the fish is in the air. TU's annotated bibliography summarizes a 2018 Idaho steelhead study that found air exposure was "significantly (1.69X) longer among anglers photographing their catch than those skipping the photo." It also found "fly anglers were more likely to photograph their catch than non-fly anglers."
That study was on Idaho steelhead, and it hasn't been tested on Georgia trout. Still, the practical fix is the same anywhere: have the phone ready, hold the fish once, and take one burst instead of several tries. Those three habits cut the steps a photo adds, whatever river you're on.
What should you do before the fish is landed?
Get the camera ready first. Keep Fish Wet's Fish Photography 101 says to keep your camera "easily accessible" and make sure "it has plenty of battery, storage capacity, and that settings for the current conditions are correct."
Before the net comes up:
- Unlock the phone and open the camera. A locked screen is lost seconds.
- Pick who shoots and who holds. One person holds the fish, the other runs the camera.
- Agree on the countdown. Keep Fish Wet suggests "Three, two, one, lift, and click!"
- Wet your hands. Per the Park Service's release guidance, "using wet hands or gloves will help reduce" damage to the fish's protective slime.
- Find the spot. Calm, shallow water where you can kneel is easiest.
Maryland DNR's catch and release page puts it in one line: "Have the camera ready and make sure the photographer understands how to use the camera before the fish is brought to the boat or shore."
What is the in-water shot?
A photo of the fish while it's still in the water, often in the net or cradled at the surface. It's the safest photo you can take. Keep Fish Wet says "try photographing your fish while it is in the water. This shows the fish in its element, and ensures that it can breathe."
How to get one:
- Leave the fish in the net, underwater, while you remove the fly. Virginia's wildlife agency notes a large net lets you "keep the fish wet if your preparing to take photos."
- Shoot from just above the surface, close to the fish.
- Wait for the water to settle so the fish shows clearly.
- Try a few angles while the fish rests and breathes.
This is the shot to take with very large fish, small wild trout, in warm water, or after a long fight. It also tends to show the fish's true colors, wet and alive.
How do you do a quick-lift shot?
Low, fast and over the water. Keep Fish Wet says that if you lift the fish, "keep it as close to the water as possible," and "let the photographer call the shots – 1, 2, 3…raise the fish...and get your shot."
The routine:
- Keep the fish in the water while the photographer gets the focus and settings ready. Keep Fish Wet: "Have the angler take a knee and keep the fish submerged as the camera focus and settings are dialed in, then communicate when everything is ready."
- Support it with two hands. Maryland DNR says to "cradle and support it with both hands."
- Never grip the gills. The NPS is direct: "Never hold a fish by the gills."
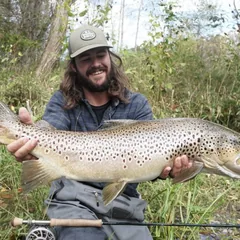
- Lift on the count, over the water and as close to it as you can, not over rocks or a boat, so if it slips, it lands in the river. Keep Fish Wet: "That way, if dropped, the fish falls" back into the water.
- Shoot a burst, then lower the fish back in.
- Check the shot after the fish is back in the water, not while you're still holding it.
Count every lift toward the same time limit. If you miss the shot, keep the fish in the water for an in-water photo or let it go. Don't hold it up while you check the screen.
Do big fish get held out longer?
Yes, and they're the ones people most want photos of. TU's bibliography summarizes a 2016 study by Lamansky and Meyer that watched trout anglers in Idaho and Oregon and found "large trout ... were exposed to air for greater durations than small or medium-sized trout." In the same study, continuous air exposure ranged "from 0 to 160 seconds," and only 4% of the anglers watched held a fish out for more than a continuous 60 seconds.
The reasons are easy to picture: a big fish is harder to hold, people want more shots, and everyone gathers around. On the Soque, which our trophy water page calls "ideal for big fish photos," that's exactly the moment to be fastest.
For a big trout, start with the in-water shot. Keep Fish Wet's tips say to "consider keeping very large fish in the water." If you do lift one:
- Plan the shot before it's in the net. Decide who holds and who shoots during the fight.
- Use two hands every time, one under the belly and one near the tail.
- Keep it low over the water in case it kicks.
- Take one burst, then lower it. Any second lift counts toward the same limit, so take the next angle in the water.
What does the research say about short versus long air time?
The findings vary, and shorter is the safe side. TU's 2014 summary notes that "brook trout ... showed no decrease in swimming performance with 60 seconds or less of air exposure but swimming performance decreases by 75% with air exposures of 120 seconds."
TU's bibliography also reports that, on average, "fish are exposed to air for < 30 seconds during the course of catch and release event." It's honest about the range of findings: one study "concluded that as little as 10 seconds of air exposure could reduce reproductive success in Atlantic Salmon" in water under 17°C, while "a number of authors failed to detect effects in salmonids exposed to air for as much as 60 seconds."
The takeaway for a photo: keep it as short as you can, because the research doesn't set a time that's harmless for every fish.
What phone settings help?
A few, and they save seconds. On an iPhone, Apple's guide to setting up your shot explains:
- Focus and exposure: "Tap the screen where you want to move the focus area. Next to the focus area, drag up or down to adjust the exposure."
- Lock them: "To lock your manual focus and exposure settings for upcoming shots, touch and hold the focus area until you see AE/AF Lock." Set the lock on the fish while it's still in the water, so the camera doesn't hunt when you lift.
- Grid: Apple's camera can show "a grid or level on the camera screen to help you straighten and compose your shot."
For the lift itself, use burst mode. Apple's burst mode page says to "drag the Shutter button left to begin taking photos in rapid succession," then pick the best frame later. One burst usually beats three separate tries.
We only checked Apple's instructions. On another phone, look in your camera app for a focus lock and a burst setting before your trip.
How do you deal with glare on the water?
With a polarizer, or by changing your angle. The North American Nature Photography Association's guide to polarizing filters says "water is probably the most reflective surface you will encounter," and that rotating a polarizer removes the reflected light. It also notes a polarizer causes "an overall reduction of about 2-stops of light," so photos get darker.
Practical options on the water:
- Shoot with the sun behind you or to the side.
- Change your angle until the glare moves off the fish.
- Use a camera polarizer if you carry a camera, not a phone.
- Remember your sunglasses. Polarized lenses can make some phone screens look dark; our polarized sunglasses guide covers that problem.
What gear makes fish photos easier?
Not much, and most of it you already own:
- A large net. Virginia's wildlife agency recommends a big net so the fish can stay wet while you get ready, which makes the in-water shot easier.
- A phone in a pocket you can reach, not buried in a pack.
- A waterproof case or dry bag for the phone between shots.
- Polarized sunglasses, so you can see the fish in the water while you set up.
On a guided trip with us, the rods, reels and flies are provided, per our rates page. You bring sunglasses, sunscreen and layers, plus your fishing license and trout license.
Can you photograph a fish when you're fishing alone?
It's harder, and the in-water shot is the safe answer. Keep Fish Wet's guidance assumes a photographer and a holder, with the photographer calling the count. Fishing alone, you can't do both quickly.
A few ways to handle it:
- Leave the fish in the net in the water and photograph it there.
- Set the phone up first, with focus and exposure locked, before you reach for the fish.
- Skip the lift. A clean in-water photo beats a rushed one-handed hold.
If you want the classic held-up shot, fish with a friend and trade turns behind the camera. It's faster for the fish and better for the photo.
What makes a fish photo look good?
A few habits photographers share, as technique rather than rules:
- Get low, close to the water, at the fish's level.
- Focus on the eye. Tap there for the focus lock.
- Fill the frame with the fish and the hands holding it.
- Keep the background simple: water, rocks or the far bank.
- Show it wet. Keep Fish Wet calls a dripping fish "a great indicator" that it's been out only briefly.
None of these need extra time out of the water. They're about where the camera is, not how long the fish is held.
When should you skip the photo?
When the fish can't spare the seconds. Signs to skip it, or take only an in-water shot:
- Warm water. Keep Fish Wet lists it as a reason to skip the photo.
- A long fight. The exercised fish in the lab study above did worse with more air time.
- A small wild trout, which you can photograph in the net or let go.
- The fish is hooked deep. Get it back in the water.
- You're fishing alone and can't hold the fish and the phone safely.
Keep Fish Wet's principles add a point most anglers miss: "Don't confuse seeing a fish 'swim away just fine' as a sign that it has completely recovered." And, "if you are not going to take a photo of your catch, consider releasing the fish without touching or netting them."
What if you're on a guided trip?
Your guide helps. On our rates page, under photos from your trip, we say "your guide captures the highlights so you can focus on fishing." Our private water on the Etowah and Soque is all catch and release, and every half-day and full-day trip on our trip finder lists photos from your trip as included.
If you'd like a photo of a particular fish, say so before it's landed, so everyone is ready. Our trophy water page calls the Soque "ideal for big fish photos," and our guide to fighting and landing a big trout covers the part before the photo.
For groups, our bachelor party page says "bring a camera or phone for photos," and "we handle a Bowman tradition of getting a group photo with everyone in it." The release itself, and reviving a tired fish, are in our trout survival guide.
Frequently Asked Questions
How many seconds can a trout be held up for a photo?
Keep Fish Wet says 10 seconds or less. Trout Unlimited's 2014 guidance is 15 to 20 seconds. Shorter is better either way.
What is the safest way to photograph a fish?
In the water. A photo of the fish in the net or at the surface lets it keep breathing and shows it in its element.
Should you hold a fish up for a photo?
Only briefly, low over the water, with wet hands and two-handed support. Never grip the gills, and lower it back in as soon as you have the shot.
What phone settings help for fish photos?
Lock focus and exposure on the fish while it's in the water, then use burst mode when you lift. On an iPhone, touch and hold the focus area until you see AE/AF Lock.
Why do fish photos take so long?
Because a photo adds steps while the fish is in the air. A 2018 Idaho steelhead study found air exposure was 1.69 times longer among anglers who photographed their catch.
When should I skip the photo?
In warm water, after a long fight, with a small wild fish or a deeply hooked one. An in-water shot is a good compromise.
Does a guide take photos on a trip?
On our trips, your guide captures the highlights so you can focus on fishing.
Photos from your trip
Your guide captures the highlights so you can focus on fishing. Private water, all catch and release.
Find Your Trip or See Trophy Water Trips →